With SharePoint 2010 we now have the ability to create custom PowerShell cmdlets that can be deployed just like any other SharePoint artifact using SharePoint Solution Packages (WSP) created with Visual Studio 2010. With SharePoint 2007 it was necessary to build a custom setup (MSI) package which had to be run on every server in the farm. This setup package would register a custom snap-in that you’d have to create which would be responsible for registering all of your custom cmdlets with the PowerShell runtime.
With SharePoint 2010 we no longer have to create a custom snap-in or setup package. When the Microsoft.SharePoint.PowerShell snap-in is loaded it examines the {SharePointRoot}/Config/PowerShell/Registration folder for any XML files and dynamically registers the cmdlets specified in the XML. As long as the SharePoint binaries have been installed on the server then you can utilize this feature (if the farm has not yet been created then you’ll have to manually GAC the assembly and deploy the registration XML file as solution deployments only work when the farm exists).
To facilitate a standard and consistent scripting experience SharePoint 2010 introduces five new base classes that all SharePoint 2010 PowerShell cmdlets should be derived from:

When creating your custom cmdlet you should carefully choose the correct base class for your cmdlet. When creating a cmdlet that is meant to work with persistent objects (objects that are to be used across calls) you should utilize one of the four task based base classes: SPRemoveCmdletBase, SPNewCmdletBase, SPSetCmdletBase, or SPGetCmdletBase. When creating cmdlets that return non-persistent objects/data or perform tasks that do not require a persistent object (e.g., Start-SP*) then you should use the SPCmdlet base class. A good example of a cmdlet that would use the SPCmdlet base class would be one what returns a report or some other information without returning back any specific objects.
Let’s now take a look at an example of a custom cmdlet that we’ll eventually package up in a SharePoint Solution Package:
 1using System;
 2using System.Collections.Generic;
 3using System.Text;
 4using Microsoft.SharePoint;
 5using Microsoft.SharePoint.PowerShell;
 6using Microsoft.SharePoint.Administration;
 7using System.Management.Automation;
 8
 9namespace Lapointe.SharePoint2010.PowerShell.Demo.Quotas
10{
11    [Cmdlet(VerbsCommon.Get, "SPQuotaTemplate"),
12    SPCmdlet(RequireLocalFarmExist = true, RequireUserFarmAdmin = true)]
13    public class SPCmdletGetQuotaTemplate : SPGetCmdletBase<SPQuotaTemplate>
14    {
15        protected override void InternalValidate()
16        {
17            if (this.Identity != null)
18            {
19                base.DataObject = this.Identity.Read();
20                if (base.DataObject == null)
21                {
22                    base.WriteError(new PSArgumentException("The quota template does not exist."), ErrorCategory.InvalidArgument, this.Identity);
23                    base.SkipProcessCurrentRecord();
24                }
25            }
26        }
27
28        protected override IEnumerable<SPQuotaTemplate> RetrieveDataObjects()
29        {
30            List<SPQuotaTemplate> list = new List<SPQuotaTemplate>();
31            if (base.DataObject != null)
32            {
33                list.Add(base.DataObject);
34                return list;
35            }
36            SPWebService webService = SPWebService.ContentService;
37            if (webService != null)
38            {
39                foreach (SPQuotaTemplate quota in webService.QuotaTemplates)
40                {
41                    list.Add(quota);
42                }
43            }
44
45            return list;
46        }
47
48        [Parameter(Mandatory = false, ValueFromPipeline = true, Position = 0), Alias(new string[] { "Name" })]
49        public SPQuotaTemplatePipeBind Identity
50        {
51            get;
52            set;
53        }
54    }
55}
In the code example above I’m returning back SPQuotaTemplate objects based on the Identity (or Name) passed into the cmdlet. If the Identity parameter is not provided then all quota templates are returned to the pipeline. In the InternalValidate method I’m checking if the Identity parameter has been provided, and if it has, I set the base class’s DataObject property by calling the Read method of the SPQuotaTemplatePipeBind object. In the override RetrieveDataObjects method I then check the DataObject property and return the value as an item in a generic list. If the DataObject property has not been set then I loop through all existing quota templates and return them as generic list. Note that if you are returning lots of items or large items it is better, and preferable, to directly call the WriteResult method and return back null – for this case I know there are typically not a lot of templates and they are not large so I just return back a single collection rather than calling WriteResult.
Pay particular attention to the SPQuotaTemplatePipeBind type – In SharePoint an object can be represented in numerous ways, for example, an SPSite object can be represented by either an URL or a GUID. In order to prevent the need to multiple parameters to support these various types Microsoft has introduced the PipeBind object which eliminates the need for these superfluous parameters and from having to create multiple parameter sets to support them. In the case of the SPQuotaTemplatePipeBind object I can pass in either an actual instance of an SPQuotaTemplate object or a name representing a quota template.
You’re not limited to what is available out of the box. You can easily create your own PipeBind objects by simply inheriting from the SPCmdletPipeBind class. Take a look at the following example which demonstrates how to create a custom SPListPipeBind object:
  1using System;
  2using System.Collections.Generic;
  3using Microsoft.SharePoint;
  4using Microsoft.SharePoint.PowerShell;
  5using System.Management.Automation;
  6using System.Globalization;
  7
  8namespace Lapointe.SharePoint2010.PowerShell.Demo.Lists
  9{
 10    public sealed class SPListPipeBind : SPCmdletPipeBind<SPList>
 11    {
 12        private bool m_IsAbsoluteUrl;
 13        private bool m_IsCollection;
 14        private Guid m_SiteGuid;
 15        private Guid m_WebGuid;
 16        private Guid m_ListGuid;
 17        private string m_WebUrl;
 18        private string m_ListUrl;
 19
 20        public SPListPipeBind(SPList instance)
 21            : base(instance)
 22        {
 23        }
 24
 25        public SPListPipeBind(Guid guid)
 26        {
 27            this.m_ListGuid = guid;
 28        }
 29
 30        public SPListPipeBind(string inputString)
 31        {
 32            if (inputString != null)
 33            {
 34                inputString = inputString.Trim();
 35                try
 36                {
 37                    this.m_ListGuid = new Guid(inputString);
 38                }
 39                catch (FormatException)
 40                {
 41                }
 42                catch (OverflowException)
 43                {
 44                }
 45                if (this.m_ListGuid.Equals(Guid.Empty))
 46                {
 47                    this.m_ListUrl = inputString;
 48                    if (this.m_ListUrl.StartsWith("http", true, CultureInfo.CurrentCulture))
 49                    {
 50                        this.m_IsAbsoluteUrl = true;
 51                    }
 52                    if (WildcardPattern.ContainsWildcardCharacters(this.m_ListUrl))
 53                    {
 54                        this.m_IsCollection = true;
 55                    }
 56                }
 57            }
 58        }
 59
 60        public SPListPipeBind(Uri listUri)
 61        {
 62            this.m_ListUrl = listUri.ToString();
 63        }
 64
 65        protected override void Discover(SPList instance)
 66        {
 67            this.m_ListGuid = instance.ID;
 68            this.m_WebGuid = instance.ParentWeb.ID;
 69            this.m_SiteGuid = instance.ParentWeb.Site.ID;
 70        }
 71
 72        public override SPList Read()
 73        {
 74            return this.Read(null);
 75        }
 76
 77        public SPList Read(SPWeb web)
 78        {
 79            SPList list = null;
 80            string parameterDetails = string.Format(CultureInfo.CurrentCulture, "Id or Url : {0}", new object[] { "Empty or Null" });
 81            if (this.IsCollection)
 82            {
 83                return null;
 84            }
 85            try
 86            {
 87                if (Guid.Empty != this.ListGuid)
 88                {
 89                    if (web == null && Guid.Empty != this.m_WebGuid && Guid.Empty != this.m_SiteGuid)
 90                    {
 91                        parameterDetails = string.Format(CultureInfo.CurrentCulture, "Id or Url: {0} and Web Id: {1}", new object[] { this.ListGuid.ToString(), this.m_WebGuid.ToString() });
 92                        using (SPSite site = new SPSite(this.m_SiteGuid))
 93                        {
 94                            web = site.OpenWeb(this.m_WebGuid);
 95                            list = web.Lists[ListGuid];
 96                        }
 97                    }
 98                    else
 99                    {
100                        parameterDetails = string.Format(CultureInfo.CurrentCulture, "Id or Url: {0} and web Url {1}", new object[] { this.ListUrl, web.Url });
101                        list = web.Lists[ListGuid];
102                    }
103                }
104                else if (!string.IsNullOrEmpty(this.ListUrl))
105                {
106                    string serverRelativeListUrl = null;
107                    if (this.m_IsAbsoluteUrl)
108                    {
109                        serverRelativeListUrl = Utilities.GetServerRelUrlFromFullUrl(this.ListUrl).Trim('/');
110                    }
111                    else
112                    {
113                        serverRelativeListUrl = this.ListUrl.Trim('/');
114                    }
115                    if (web == null)
116                    {
117                        parameterDetails = string.Format(CultureInfo.CurrentCulture, "Id or Url : {0}", new object[] { this.ListUrl });
118                        using (SPSite site = new SPSite(this.ListUrl))
119                        {
120                            web = site.OpenWeb();
121                        }
122                    }
123                    else
124                    {
125                        parameterDetails = string.Format(CultureInfo.CurrentCulture, "Id or Url : {0} and web Url {1}", new object[] { this.ListUrl, web.Url });
126                    }
127                    if (!web.Exists)
128                    {
129                        list = null;
130                    }
131                    else
132                    {
133                        list = web.GetList(serverRelativeListUrl);
134                    }
135                }
136            }
137            catch (Exception exception)
138            {
139                throw new SPCmdletPipeBindException(string.Format("The SPList Pipebind object could not be found ({0}).", parameterDetails), exception);
140            }
141            if (list == null)
142            {
143                throw new SPCmdletPipeBindException(string.Format("The SPList Pipebind object could not be found ({0}).", parameterDetails));
144            }
145            return list;
146        }
147
148        public bool IsCollection
149        {
150            get
151            {
152                return this.m_IsCollection;
153            }
154        }
155
156        public Guid ListGuid
157        {
158            get
159            {
160                return this.m_ListGuid;
161            }
162        }
163
164        public string ListUrl
165        {
166            get
167            {
168                return this.m_ListUrl;
169            }
170        }
171    }
172}
There are two core components that are required for a custom PipeBind object. The first is to have a constructor that takes in the type that you wish to convert (in this example, a string, URI, or GUID) to the target object. The second is to override the Read method which is used to convert the argument value passed into the constructor into the target type. In some cases you’ll need additional information which must be provided by the calling code – for example, if a GUID is passed in, representing the List ID, then you will also need to provide the SPWeb object which contains the List; this is done by creating an overload for the Read method which accepts an SPWeb object. It’s up to the calling code to determine which overload to call.
Let’s now look at how we can package our SPCmdletGetQuotaTemplate class into a SharePoint Solution Package using Visual Studio 2010.
From a new instance of Visual Studio 2010:
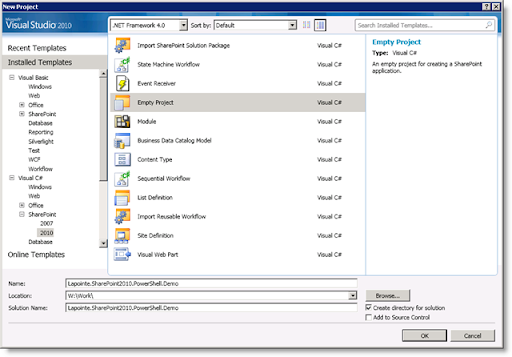
- Click File > New > Project to create a new Visual Studio Project
- In the New Project dialog select Visual C#/SharePoint/2010 in the Installed Templates panel and then select Empty Project:

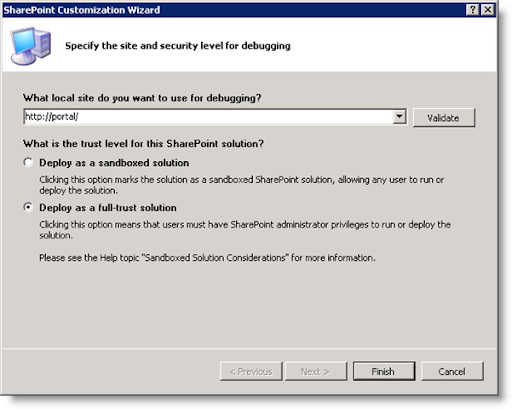
- After you click OK you will be taken to the SharePoint Configuration Wizard:

You can specify any site to use for debugging as we won’t be using it for PowerShell development (note that when you start the debugger you’ll be given a warning if the specified site’sweb.configdoes not allow debugging). PowerShell cmdlets must be deployed to the GAC so select Deploy as full-trust solution and click the Finish button to create the project.
The first thing we need to do with our new empty project is to add a couple of project references:
- Right-click the References folder in the project and select Add Reference…
- In the Add Reference dialog’s .NET tab select Microsoft.SharePoint.PowerShell and System.Management.Automation
- Click OK to add the references to the project
Now that we have our references added we can setup our project structure. PowerShell cmdlets are not deployed using Features so we can delete the starting Feature folder that is created:
- Expand the Features folder
- Right-click the Feature1 Feature and click Delete
The next step is to add a SharePoint Mapped Folder:
- Right-click the project and click Add > SharePoint Mapped Folder…
- Add the {SharePointRoot}/Config/PowerShell/Registration folder
Note that you can add the Format and Help folders as well but I won’t be using those in this example as creating help and format files are outside the scope of this article (I usually will add the **{SharePointRoot}/Config/PowerShell **folder and then manually add the three sub-folders so that I can keep things grouped together in one parent folder within my project). - Click OK to add the mapped folder
If a folder is created under the Registration folder then go ahead and delete it (this sub-folder is automatically added in Beta1 but may not be added come RTM)
In the new Registration mapped folder create a new XML file (you can name it anything you like but I usually give it the same name as my project) and paste the following XML into the file:
 1<?xml version="1.0" encoding="utf-8" ?>
 2<ps:Config xmlns:ps="urn:Microsoft.SharePoint.PowerShell"
 3                     xmlns:xsi="http://www.w3.org/2001/XMLSchema-instance"
 4                     xsi:schemaLocation="urn:Microsoft.SharePoint.PowerShell  SPCmdletSchema.xsd">
 5
 6  <ps:Assembly Name="$SharePoint.Project.AssemblyFullName$">
 7    <ps:Cmdlet>
 8      <ps:VerbName>Get-SPQuotaTemplate</ps:VerbName>
 9      <ps:ClassName>Lapointe.SharePoint2010.PowerShell.Demo.Quotas.SPCmdletGetQuotaTemplate</ps:ClassName>
10      <ps:HelpFile>Lapointe.SharePoint2010.PowerShell.Demo.dll-help.xml</ps:HelpFile>
11    </ps:Cmdlet>
12  </ps:Assembly>
13</ps:Config>
Note that the <ps:HelpFile /> element does require a value but the file specified does not have to exist.
Now we simply need to paste in the code for the SPCmdletGetQuotaTemplate class from above:
- Create a folder below the project root called Quotas
- Add a new class file named SPCmdletGetQuotaTemplate.cs
- Paste the code from above into this file (be sure to adjust your namespaces in the class file and the XML file if you used a different project name than the one shown)
You now have a complete SharePoint 2010 PowerShell Solution – all that’s left is to build and deploy it:
- Right-click the project name and select Deploy
Notice what is happening in the output window – IIS application pools are being recycled along with the retraction and deployment of the solution. Because this is a PowerShell solution we don’t need IIS to be recycled so let’s create a new deployment configuration to remove the recycling of the application pools which should speed up our deployment time:
- Right-click the project and select Properties
- In the properties dialog select the Deploy tab
- In the Edit Configurations group select New to create a new deployment action
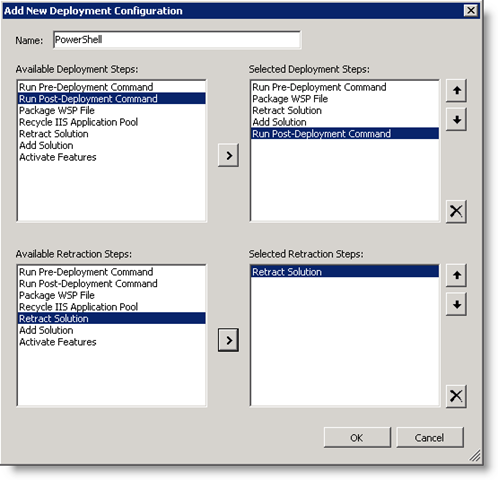
- Name the new deployment action PowerShell and configure the deployment steps as shown below:

- Click OK to save the new deployment configuration
Now that we have our custom deployment configuration we need to tell our project to use this configuration. Make sure the Properties Window is visible (type F4 if not) and select the project. Select the PowerShell configuration we just created in the Active Deployment Configuration drop-down.
Our final configuration setting change is to configure the project so that it will open PowerShell when we start the debugger:
- Right-click the project and select Properties to return to the project’s properties dialog
- Click the Debug tab
- Select the radio button next to Start external program and specify the following value:
C:\Windows\System32\WindowsPowerShell\v1.0\PowerShell.exe - Paste the following into the Command line arguments text box:
-NoExit " & ' C:\Program Files\Common Files\Microsoft Shared\Web Server Extensions\14\CONFIG\POWERSHELL\Registration\sharepoint.ps1 ' "
You can now start the debugger (F5) which will load a PowerShell console and register the SharePoint 2010 snap-in which results in the loading of your new custom cmdlet. To verify that the cmdlet is loaded type Get-Command Get-SPQuotaTemplate | Format-List. You should see the following output:
PS C:\> Get-Command Get-SPQuotaTemplate | Format-List

Name             : Get-SPQuotaTemplate
CommandType      : Cmdlet
Definition       : Get-SPQuotaTemplate [[-Identity] <SPQuotaTemplatePipeBind>]
                   [-AssignmentCollection <SPAssignmentCollection>] [-Verbose]
                   [-Debug] [-ErrorAction <ActionPreference>] [-WarningAction <
                   ActionPreference>] [-ErrorVariable <String>] [-WarningVariab
                   le <String>] [-OutVariable <String>] [-OutBuffer <Int32>]

Path             :
AssemblyInfo     :
DLL              : C:\Windows\assembly\GAC_MSIL\Lapointe.SharePoint2010.PowerSh
                   ell.Demo\1.0.0.0__xxxxxxxxxxxxxxxx\Lapointe.SharePoint2010.P
                   owerShell.Demo.dll
HelpFile         : C:\Program Files\Common Files\Microsoft Shared\Web Server Ex
                   tensions\14\CONFIG\PowerShell\Help\Lapointe.SharePoint2010.P
                   owerShell.Demo.dll-help.xml
ParameterSets    : {[[-Identity] <SPQuotaTemplatePipeBind>] [-AssignmentCollect
                   ion <SPAssignmentCollection>] [-Verbose] [-Debug] [-ErrorAct
                   ion <ActionPreference>] [-WarningAction <ActionPreference>]
                   [-ErrorVariable <String>] [-WarningVariable <String>] [-OutV
                   ariable <String>] [-OutBuffer <Int32>]}
ImplementingType : Lapointe.SharePoint2010.PowerShell.Demo.Quotas.SPCmdletGetQu
                   otaTemplate
Verb             : Get
Noun             : SPQuotaTemplate
As you can see, creating and deploying custom PowerShell cmdlets for SharePoint 2010 using Visual Studio 2010 is now super easy. The only complexity lies in the logic of the cmdlet itself.
As you probably expected I have already been hard at work on creating some new cmdlets to replace some of my old PowerShell cmdlets as well as a few select STSADM commands. I’ll be releasing these new cmdlets with full source shortly – keep checking back here for more example code and downloads!
