
With SharePoint 2010 we now have the ability to allow SharePoint to manage various service accounts thus foregoing the need to have IT administrators manually manage password changes. This new feature is a great benefit to SharePoint administrators and security conscious admins in general as it allows us to easily enforce our corporate security policies by changing these passwords on a schedule, and the administrators don’t even know what the password is so the likelihood of a compromise due to a disgruntled admin, though not eliminated, is somewhat reduced.
But the introduction of this new feature isn’t all good. The complication comes from the fact that SharePoint 2010 doesn’t implement this capability consistently. So an account that is configured as a Managed Service Account and set to have its password changed automatically could also be used in certain places that don’t understand the managed account concept. When the managed account password is changed the feature that uses that account and only knows the username and password (so it does not use the managed account details) will effectively be broken. As an example, if you configure the Enterprise Search Service to use a managed account whose password is scheduled to be changed every 30 days and you use that same account for the content crawl account then when that password is changed the content crawl will cease to function as it will be unable to authenticate the account. It’s important to note, however, that this issue only comes to light when you configure the managed account to have it’s password changed automatically.
So what things can be managed accounts and what cannot? The following lists what I’ve come across so far (if I’ve missed anything please leave a comment so I can update these lists):
Managed Service Accounts:
- All Service Application Pool Accounts
- Access Service Application
- BCS Service Application
- Excel Services Service Application
- Metadata Service Application
- PerformancePoint Service Application
- Enterprise Search Service Application
- Secure Store Service Application
- Subscription Settings Service Application
- User Profile Service Application
- Visio Services Service Application
- Web Analytics Service Application
- Word Automation Service Application
- Word Viewing Service Application
- PowerPoint Viewing Service Application
- Security Token Service Application
- All Content Web Application Pools
- Service Instances
- Claims to Windows Token Service
- Document Conversion Launcher Service
- Document Conversion Load Balancer Service
- Microsoft SharePoint Foundation Sandboxed Code Service
- SharePoint Foundation Help Search
- SharePoint Server Search (Enterprise Search)
- Web Analytics Data Processing Service
Service Accounts (should not be managed):
- Search Crawl Accounts
- For Foundation Search and Server (Enterprise) Search
- Unattended User Accounts
- Excel Services Service Application
- Visio Services Service Application
- PerformancePoint Service Application
- (in general, any Secure Store application credentials)
- Object Cache Portal Accounts
- Super User Account
- Super Reader Account
- User Profile
- Synchronization Service Account (listed incorrectly on the FarmCredentialManagement.aspx page)
- Synchronization Connection Account
- Server Search Custom Crawl Rule Accounts
- Any crawl rule that specifies an account other than the default crawl account
Again, these are just the accounts that I’ve personally bumped up against so it may not be a complete listing.
Viewing and Creating Managed Accounts
To see the current list of Managed Service Accounts using Central Admin go to Security –> Configure managed accounts:

You can edit the settings for any managed account by simply clicking the edit icon associated with the account you wish to modify. Once on the Manage Account screen you can configure the automatic password change settings:

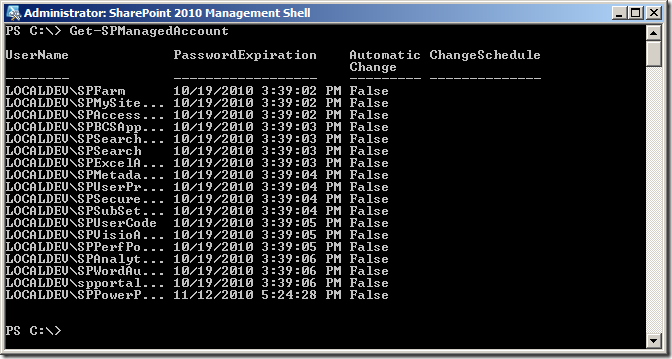
To perform the same tasks using Windows PowerShell we can use the Get-SPManagedAccount cmdlet to retrieve the list of managed accounts:
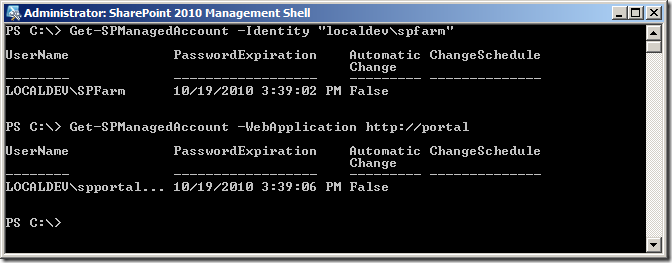
Or we can retrieve a specific account using the -Identity parameter or by passing in a Web Application or Service:
To change the settings for a Managed Account we can use the Set-SPManagedAccount cmdlet:

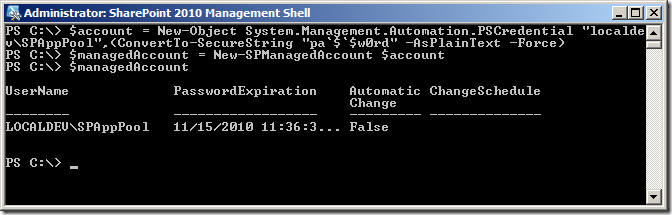
To create a new Managed Account we use the New-SPManagedAccount cmdlet. In the example below I’m manually creating a PSCredential object so that I can specify my password (pa$$w0rd) in script (very useful for building out dev or test environments – otherwise you should use Get-Credential to prompt for the password so that it is not hard coded anywhere):
Applying Managed Accounts
Once you have your Managed Accounts created you can begin to use them for things such as Service Instances and Service and Content Application Pools. To associate a managed account with a specific Service Instance using Central Admin you can go to Security –> Configure service accounts. On the Service Accounts page you can set the account used for the Farm Account, Service Instances, Web Content Application Pools, and Service Application Pools. The Service Instances are highlighted in the following image:

Service Instances
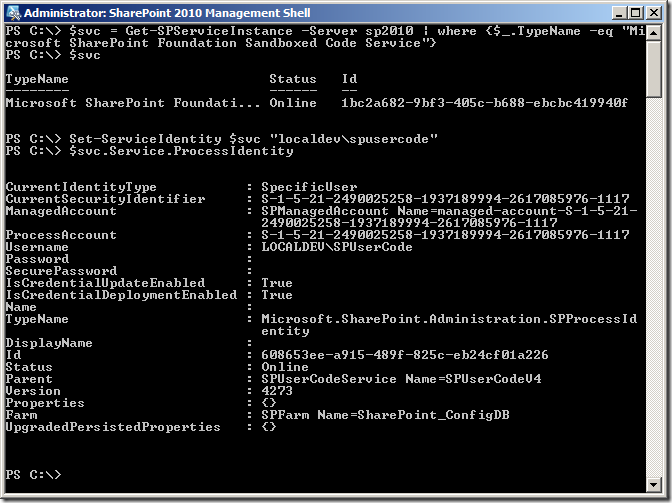
To set the account associated with a particular Service Instance using Windows PowerShell we simply get the ProcessIdentity property of the Service Instance and set its Username property. Once set we call Update() to update the Configuration Database and then Deploy() to push the change out to all Service Instances. To make this easier I put this code in a function that I can call by passing in the Service Instance and credentials to use:
1function Set-ServiceIdentity($svc, $username) {
2   $pi = $svc.Service.ProcessIdentity
3   if ($pi.Username-ne $username) {
4       $pi.Username= $username
5       $pi.Update()
6       $pi.Deploy()
7    }
8}
Here’s an example of how you can call this function:
Service Application Pools
To create a new Service Application pool we use the New-SPServiceApplicationPool cmdlet and pass in the name of the Application Pool to create and the Managed Account to assign as the Application Pool identity:

It’s extremely important to note that the application pool that you create using the New-ServiceApplicationPool cmdlet cannot be used for your content Web Applications. Unfortunately there is no out-of-the-box equivalent for creating Application Pools for Web Applications.
Web Application Pools
As previously noted there is no cmdlet for creating Application Pools for Web Applications. Instead what you need to do is first check if the Application Pool you need already exists by using the SPWebService’s ContentService static property. If it exists then pass in just the name of the Application Pool to the New-SPWebApplication cmdlet, otherwise pass in the name and the Managed Account to use as the Application Pool’s identity:

Applying Service Accounts
When it comes to applying non-managed accounts to the various features things get a little more complicated. Let’s start with the Crawl Accounts.
SharePoint Foundation Search Service
For SharePoint Foundation Search we can set the crawl account (or content access account) using Central Admin by navigating to the Services on Server page and clicking the SharePoint Foundation [Help] Search link which takes you to the settings page where we can set the crawl account:

To set the same information using Windows PowerShell we actually have to go old-school and use STSADM as there’s no PowerShell equivalent cmdlet. Here’s a snippet of PowerShell code that I use to accomplish this:
 1function ConvertTo-UnsecureString([System.Security.SecureString]$string) {
 2    $unmanagedString = [System.Runtime.InteropServices.Marshal]::SecureStringToGlobalAllocUnicode($string)
 3    $unsecureString = [System.Runtime.InteropServices.Marshal]::PtrToStringUni($unmanagedString)
 4    [System.Runtime.InteropServices.Marshal]::ZeroFreeGlobalAllocUnicode($unmanagedString)
 5
 6    return $unsecureString
 7}
 8
 9$searchSvcAccount = Get-Credential "localdev\spsearchsvc"
10$crawlAccount = Get-Credential "localdev\spcrawl"
11
12$stsadmArgs = "-o spsearch -action start " + `
13    "-farmserviceaccount `"$($searchSvcAccount.Username)`" " + `
14    "-farmservicepassword `"$(ConvertTo-UnsecureString $searchSvcAccount.Password)`" " + `
15    "-farmcontentaccessaccount `"$($crawlAccount.Username)`" " + `
16    "-farmcontentaccesspassword `"$(ConvertTo-UnsecureString $crawlAccount.Password)`" " + `
17    "-databaseserver `"spsql1`" " +  `
18    "-databasename `"SharePoint_FoundationSearch`""
19
20Write-Host "Running: stsadm $stsadmArgs"
21$stsadmoutput = cmd /c "stsadm $stsadmArgs" 2>&1
22if ($lastexitcode -ne 0) {
23    throw "Unable to start Foundation Search Service.`n$stsadmoutput"
24}
Note that I’m using a helper function to convert the secure password to a static string which I can then pass to the STSADM spsearch command.
SharePoint Server Search Service
To manage the crawl account for the SharePoint Server Search Service (also known as the Enterprise Search Service) using Central Admin we simply need to navigate to the Search Administration page of the Service Application that we wish to modify and click the link for the Default content access account. This will bring up the following screen:

Note that by default this account will be set to be the same account you used for the Search Service Instance which is a Managed Account. If you do not change this account and you have configured SharePoint to manage the account password then your crawls will fail when the password changes. To make this change using Windows PowerShell we use the
Set-SPEnterpriseSearchServiceApplicationcmdlet:
1$crawlAccount = Get-Credential "localdev\spcrawl"
2
3$searchApp | Set-SPEnterpriseSearchServiceApplication -DefaultContentAccessAccountPassword $crawlAccount.Password -DefaultContentAccessAccountName $crawlAccount.Username
Remember not to do this step until after you have provisioned the Administration Component.
Object Cache Accounts
Many administrators when they first configure SharePoint 2010 and hit a Web Application for the first time are likely to see a recurring event in the event log stating that the object cache has not been configured correctly. The specific error is as follows:
Object Cache: The super user account utilized by the cache is not configured. This can increase the number of cache misses, which causes the page requests to consume unneccesary system resources.
This is essentially telling you that you have missed a manual configuration step in which you need to run some PowerShell to set two accounts for SharePoint to use to access the object cache:
 1function Set-WebAppUserPolicy($webApp, $userName, $userDisplayName, $perm) {
 2    [Microsoft.SharePoint.Administration.SPPolicyCollection]$policies = $webApp.Policies
 3    [Microsoft.SharePoint.Administration.SPPolicy]$policy = $policies.Add($userName, $userDisplayName)
 4    [Microsoft.SharePoint.Administration.SPPolicyRole]$policyRole = $webApp.PolicyRoles | where {$_.Name -eq $perm}
 5    if ($policyRole -ne $null) {
 6        $policy.PolicyRoleBindings.Add($policyRole)
 7    }
 8    $webApp.Update()
 9}
10$webApp = Get-SPWebApplication "http://content"
11$portalSuperUserAccount = Get-Credential "localdev\SPSuperUser"
12$webApp.Properties["portalsuperuseraccount"] = $portalSuperUserAccount.UserName
13Set-WebAppUserPolicy $webApp $portalSuperUserAccount.UserName $portalSuperUserAccount.UserName "Full Control"
14
15$portalSuperReaderAccount = Get-Credential "localdev\SPSuperReader"
16$webApp.Properties["portalsuperreaderaccount"] = $portalSuperReaderAccount.UserName
17Set-WebAppUserPolicy $webApp $portalSuperReaderAccount.UserName $portalSuperReaderAccount.UserName "Full Read"
Make sure that you do not use the same account for both the super user and super reader. (And of course make sure you change the URL and account names to match your environment). For more information about these settings see the following TechNet article: http://technet.microsoft.com/en-us/library/ff758656.aspx
Unattended Accounts
There are some services, specifically the Visio Services Service Application, the Excel Services Service Application, and the PerformancePoint Service Application, that allow us to set an account that we can use for access data sources behind the scenes. These are called unattended access accounts. To set these accounts we must create a new target application in the Secure Store Service Application and associate the target application’s ID with the appropriate Service Application. The following PowerShell code demonstrates how to do this for the Visio Services Service Application (the Excel Services Service Application is virtually identical and just uses cmdlets specific to Excel rather than Visio; PerformancePoint is a lot simpler):
 1#Get the Visio Service App
 2$svcApp = Get-SPServiceApplication | where {$_.TypeName -like "*Visio*"}
 3#Get the existing unattended account app ID
 4$unattendedServiceAccountApplicationID = ($svcApp | Get-SPVisioExternalData).UnattendedServiceAccountApplicationID
 5#If the account isn't already set then set it
 6if ([string]::IsNullOrEmpty($unattendedServiceAccountApplicationID)) {
 7    #Get our credentials
 8    $unattendedAccount = Get-Credential "localdev\SPUnattended"
 9
10    #Set the Target App Name and create the Target App
11    $name = "$($svcApp.ID)-VisioUnattendedAccount"
12    Write-Host "Creating Secure Store Target Application $name..."
13    $secureStoreTargetApp = New-SPSecureStoreTargetApplication -Name $name `
14        -FriendlyName "Visio Services Unattended Account Target App" `
15        -ApplicationType Group `
16        -TimeoutInMinutes 3
17
18    #Set the group claim and admin principals
19    $groupClaim = New-SPClaimsPrincipal -Identity "nt authority\authenticated users" -IdentityType WindowsSamAccountName
20    $adminPrincipal = New-SPClaimsPrincipal -Identity "$($env:userdomain)\$($env:username)" -IdentityType WindowsSamAccountName
21
22    #Set the account fields
23    $usernameField = New-SPSecureStoreApplicationField -Name "User Name" -Type WindowsUserName -Masked:$false
24    $passwordField = New-SPSecureStoreApplicationField -Name "Password" -Type WindowsPassword -Masked:$false
25    $fields = $usernameField, $passwordField
26
27    #Set the field values
28    $secureUserName = ConvertTo-SecureString $unattendedAccount.UserName -AsPlainText -Force
29    $securePassword = $unattendedAccount.Password
30    $credentialValues = $secureUserName, $securePassword
31
32    #Get the service context
33    $subId = [Microsoft.SharePoint.SPSiteSubscriptionIdentifier]::Default
34    $context = [Microsoft.SharePoint.SPServiceContext]::GetContext($svcApp.ServiceApplicationProxyGroup, $subId)
35
36    #Check to see if the Secure Store App already exists
37    $secureStoreApp = Get-SPSecureStoreApplication -ServiceContext $context -Name $name -ErrorAction SilentlyContinue
38    if ($secureStoreApp -eq $null) {
39        #Doesn't exist so create.
40        Write-Host "Creating Secure Store Application..."
41        $secureStoreApp = New-SPSecureStoreApplication -ServiceContext $context `
42            -TargetApplication $secureStoreTargetApp `
43            -Administrator $adminPrincipal `
44            -CredentialsOwnerGroup $groupClaim `
45            -Fields $fields
46    }
47    #Update the field values
48    Write-Host "Updating Secure Store Group Credential Mapping..."
49    Update-SPSecureStoreGroupCredentialMapping -Identity $secureStoreApp -Values $credentialValues
50
51    #Set the unattended service account application ID
52    $svcApp | Set-SPVisioExternalData -UnattendedServiceAccountApplicationID $name
53}
When it comes to PerformancePoint we have a lot less work we need to do as the product team was nice enough to make it so that the Set-SPPerformancePointSecureDataValues does all the work of setting up the target application for us (note though that they did screw up how the Service Application is passed into the cmdlet requiring you to pass in the ID of the Service Application rather than the actual Service Application object):
1$unattendedAccount = Get-Credential "localdev\SPUnattended"
2$secureValues = Get-SPPerformancePointSecureDataValues -ServiceApplication $svcApp.Id
3if ($secureValues.DataSourceUnattendedServiceAccount -ne $unattendedServiceAccount.UserName) {
4    Write-Host "Setting unattended service account $($unattendedServiceAccount.UserName)..."
5    $svcApp.Id | Set-SPPerformancePointSecureDataValues -DataSourceUnattendedServiceAccount $unattendedServiceAccount
6}
User Profile Synchronization Service Identity
One thing to watch out for is when setting the account for the User Profile Synchronization Service. This service wants you to use the Farm Account as the identity. This means that your Farm Admin account cannot have it’s password managed by SharePoint if you intend to use this service (or at least, it shouldn’t be unless you don’t mind manually fixing this service every time your password changes – good luck with that BTW). Your Farm Admin account will always be a Managed Account (you can’t change that) so be extra careful when changing this accounts password (either manually or automatically). To set this account using Central Admin you can click Start next to the User Profile Synchronization Service entry on the Services on Server page.

To accomplish the same thing using PowerShell we need to get an instance of the Synchronization Service and set a few properties and call the SetSynchronizationMachine method passing in the username and password of the Farm Admin account (note that it requires the password be passed in as a standard string and not a secure string so I use my previously defined ConvertTo-UnsecureString function):
 1$syncMachine = Get-SPServer "sp2010dev"
 2$profApp = Get-SPServiceApplication | where {$_.Name -eq "User Profile Service Application 1"}
 3$account = Get-Credential "localdev\spfarm"
 4if ($syncMachine.Address -eq $env:ComputerName) {
 5    $syncSvc = Get-SPServiceInstance -Server $env:ComputerName | where {$_.TypeName -eq "User Profile Synchronization Service"}
 6    $syncSvc.Status = [Microsoft.SharePoint.Administration.SPObjectStatus]::Provisioning
 7    $syncSvc.IsProvisioned = $false
 8    $syncSvc.UserProfileApplicationGuid = $profApp.Id
 9    $syncSvc.Update()
10    $profApp.SetSynchronizationMachine($syncMachine.Address, $syncSvc.Id, $account.UserName, (ConvertTo-UnsecureString $account.Password))
11}
12
13if ($syncSvc.Status -ne "Online") {
14    Write-Host "Starting User Profile Synchronization Service..."
15    Start-SPServiceInstance $syncSvc
16}
17do {Start-Sleep 2} while ((Get-SPServiceInstance -Server $env:ComputerName | where {$_.TypeName -eq "User Profile Synchronization Service"}).Status -ne "Online")
Summary
As you can see setting the accounts that are used throughout SharePoint 2010 is anything but consistent and in some cases a real pain in the a$$. I know I didn’t cover how to set every account (custom crawl rule accounts, user profile sync connection accounts, others?) but hopefully someone out there has already documented these, or if not perhaps they’d be nice enough to post a comment here for others benefit from (maybe one day I’ll add them myself but for now I think this post is quite long enough). As always, please let me know if I’ve missed something or otherwise got something wrong as I certainly don’t claim to have all the answers.
Happy PowerShelling 