
Update 10/25/2017: This article originally appeared on ITUnity.com but as that site has been decommissioned I’ve republished it here.
In the Introduction to the SharePoint Online Management Shell article you learned how to get connected to your SharePoint Online tenant using the SharePoint Online Management Shell and in the Exploring the SharePoint Online Cmdlets article you were introduced to the list of available cmdlets along with some details on the less commonly used cmdlets. In this article I want to cover some specific usage examples of some of the core Site Collection and security cmdlets.
Get a Site Collection
To start, let’s look at the Get-SPOSite cmdlet, which you use to retrieve a Site Collection. This cmdlet takes an optional URL to a Site Collection, and if you don’t provide one it will return all the Site Collections within the specified limit, if provided. If you don’t provide a limit by using the -Limit parameter, then it will default to a limit of 200. The objects this cmdlet returns are of type Microsoft.Online.SharePoint.PowerShell.SPOSite. By default, only some of the properties will actually contain valid values while the others will contain default values that may not reflect what the actual settings are.
To make sure that all the properties have valid values set, make sure you provide the -Detailed parameter. This can be crucial if you are creating a script that will be making decisions based on these values. So whenever I’m working with the cmdlet in a script, I always provide this parameter; that said, if all I want to see is the list of Site Collections, then I don’t worry about it. Also, you should note that at the time of writing this article, the TechNet documentation detailing what additional properties are updated when the -Detailed parameter is provided is incomplete. Figure 1 highlights some of the differences you can expect to see with and without the parameter provided.
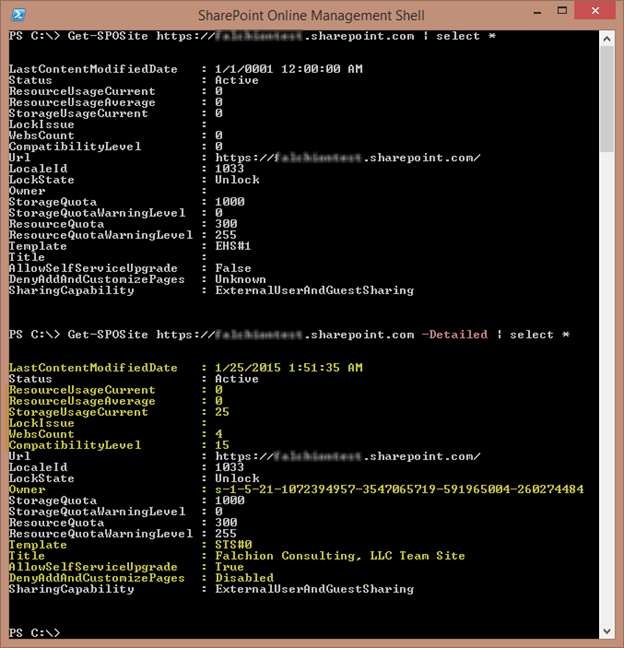
Figure 1: Comparing Get-SPOSite cmdlet results using the –Detailed parameter.
If you’re familiar with the Get-SPSite cmdlet that comes with the on-premises version of SharePoint, then you may have some experience with using the -Filter parameter for that cmdlet, or you may have at least seen it if not used it. This parameter allows you to do a server-, or specifically database-level filter, thereby reducing the amount of data that needs to be transmitted between the different tiers. The Get-SPOSite cmdlet also supports this parameter, as shown in figure 2. However, not all of the SPOSite object properties can be used and I’ve yet to find a definitive list of what is valid, so I recommend just using a little trial and error if you wish to use it.
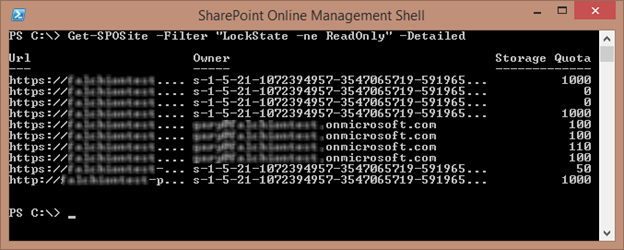
Figure 2: Using the Get-SPOSite cmdlet using the –Filter parameter
I’ve mentioned this a couple of times already but I think it’s important to call out again. The SPOSite object returned by the Get-SPOSite cmdlet has no methods on it. This means that if you need to change something about the Site Collection, then you must use the cmdlets that are available. For example, you can use the Set-SPOSite cmdlet to set the title of the Site Collection or alter resource and storage quota values. Also, many of the SPOSite properties have setters, which means you might think that you can use the properties to change the values. Though you can change the property value, there is no way to actually commit those values and cmdlets like the Set-SPOSite cmdlet won’t use any of these property values because they only consider the values that the cmdlet’s parameters provide. And finally, as I mentioned previously, there is no way to iterate or manipulate child objects. So if you need to see information about the child webs or lists and libraries, then you’re out of luck. You’ll have to create some custom code to use the REST or CSOM capabilities of SharePoint to discover the information, as you’ll see in Part 2 and Part 3 of this series. Perhaps a later version of the SharePoint Online cmdlets will add additional cmdlets to allow this deeper level of inspection, but in the meantime you do have community-provided cmdlets such as those I’ll cover in Part 4 of this series.
Create a Site Collection
Using PowerShell to create a SharePoint Online Site Collection is very similar to what you would do with the on-premises version of the SharePoint cmdlets, with just a couple minor exceptions. To create a SharePoint Online Site Collection you use the New-SPOSite cmdlet, passing in the required -URL, -Owner and -StorageQuota parameters:
1New-SPOSite -Url "https://contoso.sharepoint.com/sites/Sales" -Title "Sales" -Owner "admin@contoso.com" -Template "STS#0" -TimeZoneId 10 -StorageQuota 100
The required -StorageQuota parameter is one of the differences between this cmdlet and the equivalent New-SPSite cmdlet. With SharePoint on-premises, associating a quota template with a Site Collection is considered a best practice and is always recommended, but it is not required. With SharePoint Online, however, providing a quota limit is required. What’s interesting is that the minimum acceptable quota limit is 100MB, so if you need a smaller value you’re out of luck. I view this as a marketing decision by Microsoft because the more space you use, the more they can charge you, so it would ultimately be to their disadvantage to allow you to set a smaller quota size. Usually, when I create a Site Collection I like the cmdlet to block until the creation is complete because more times than not I want to do something else to the Site Collection after it’s created. However, if you’re creating a whole mess of Site Collections then you may want the cmdlet to return immediately, in which case you can provide the -NoWait parameter.
If you’re like me and you haven’t memorized every possible Web template configuration code, then you can use the Get-SPOWebTemplate cmdlet. This cmdlet will dump all the installed templates (figure 3) that are valid for your tenant. Note that the templates that are available are not necessarily the same as those that might be available with a SharePoint on-premises installation. Currently fewer templates are available and you get one additional (EHS#1), but there’s nothing that says that more won’t be added in the future.
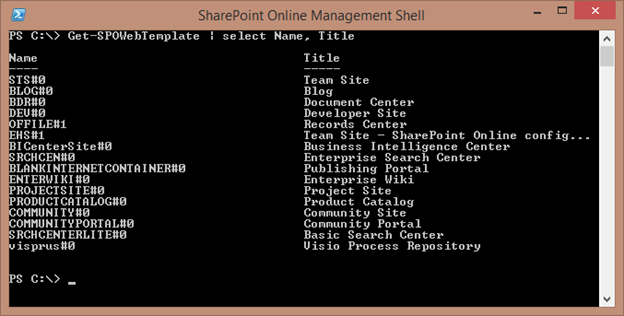
Figure 3: Use the Get-SPOWebTemplate cmdlet to list all the installed templates that are valid for your tenant
Give Access to a Site Collection
For me, the big reason to automate the creation of Site Collections is to make sure that the security of the Site Collection lines up with my governance policy around security. Of course, if you don’t have a security governance policy, you likely have other problems to be worrying about long before you should even consider the automation of anything—for without a policy, then all you’re doing is automating chaos. So, with that said, one of the first things you may want to do is create SharePoint Groups. You should avoid assigning users permissions directly to your Sites and lists, so using SharePoint Groups can make security management much easier.
To create the group, use the New-SPOSiteGroup cmdlet and pass in the Site Collection to create the group within, the name of the group, and the permission levels to assign to the group. You can pass in an array for the permission level values. The permission levels are customizable, but the default ones are Full Control, Design, Edit, Contribute, Read and View Only. There’s also Limited Access, but that permission level is meant for special use by SharePoint and you should seldom be assigning it directly.
1$site = Get-SPOSite "https://contoso.sharepoint.com/sites/Sales"
2
3$group = New-SPOSiteGroup -Site $site -Group "Designers" -PermissionLevels "Design","Edit"
Once you’ve created the SharePoint Group, you can now use the Add-SPOUser cmdlet to add users to that group. Keep in mind that the user must, of course, be a valid Office 365 user, so you can’t just add arbitrary email addresses:
1Add-SPOUser -Site $site -Group $group.LoginName -LoginName "tessa@contoso.com"
Notice how I’m using the LoginName property of the SPOSiteGroup object returned by the New-SPOSiteGroup call in the previous example. The Add-SPOUser‘s -Group parameter takes a string as its value type so you can’t pass in an SPOSiteGroup object directly. I only point this out because earlier versions of the cmdlet actually allowed you to pass in either a string name for the group or the actual SPOSiteGroup object. Now unfortunately this is as far as you can take the security management as there’s no way to set the security of a Site, List, or List Item or to create custom permission levels; but, I figure this is better than nothing, and at least it gets me in the right direction.
Delete and Recover a Site Collection
When you have a large SharePoint Online environment, inevitably you’re going to need to delete some Site Collections. I don’t know how often you’ll end up wanting to automate the deletion of one or more Site Collections with PowerShell, but I imagine there will be those occasional times where it makes sense. So, if you want to go ahead and delete a whole bunch of Site Collections or you just really love PowerShell and want to use it to delete that one Site Collection just because you can, well, all you have to do is call the Remove-SPOSite cmdlet and it’s gone. Sort of. If you really want it completely gone you’ll have to call another cmdlet because the Remove-SPOSite cmdlet will actually just put it in the Recycle Bin for 30 days. It can take a few minutes for the cmdlet to finish up so if you’ve got some other damage you’d like to do and don’t want to wait for this one to finish, you can simply pass the -NoWait parameter.
If you’re looking to delete a bunch of Site Collections and you’re intention is in fact not to cause damage, then I recommend that you first run the cmdlet with the -WhatIf parameter, just to avoid the annoyance of having to run the Restore-SPODeletedSite cmdlet. The Restore-SPODeletedSite cmdlet does the opposite of the Remove-SPOSite cmdlet in that it moves the Site Collection out of the recycle bin. If 30 days have passed since the Site Collection was placed in the Recycle Bin, then the Site Collection is gone and this cmdlet is useless to you.
If you’re sure you know what you’re doing and just really, really want that Site Collection gone now, then you can use the Remove-SPODeletedSite cmdlet to permanently delete the Site Collection. This cmdlet only works on Site Collections in the Recycle Bin, so permanently deleting a Site Collection is a two-step process, as you can see in the following example:
1$url = "http://contoso.sharepoint.com/sites/Sales"
2Remove-SPOSite $url
3Remove-SPODeletedSite $url
Summary
Managing Site Collections and their security settings using the SharePoint Online cmdlets is a convenient and powerful way to apply your provisioning-related governance requirements in a consistent and predictable manner. However, these cmdlets are obviously only going to take you so far as you will no doubt want to do much more than what has been detailed in this article. To learn more about manipulating your Site Collections see the Connecting to SharePoint Online using the SharePoint CSOM API with Windows PowerShell article.