
Update 10/25/2017: This article originally appeared on ITUnity.com but as that site has been decommissioned I’ve republished it here.
In a previous article, Connecting to SharePoint Online using the SharePoint CSOM API with Windows PowerShell and the related CSOM articles that followed it, I discussed how you can use Windows PowerShell to inspect and manage SharePoint Online Site Collections, Sites, Lists and List Items using the managed .NET objects provided as part of the SharePoint CSOM API. In this article, and the two articles that follow, I want to demonstrate how you can do effectively all the same tasks but this time by using the SharePoint 2013 REST Service, a new API that is based on the Open Data Protocol (OData) syntax and was introduced with SharePoint 2013. Using the REST service, you can easily work remotely with both SharePoint Online and SharePoint on-premises.
What is REST?
REST, or Representational State Transfer, uses HTTP verbs to perform basic create, read, update and delete (CRUD) operations against a web service endpoint. RESTful web services, based on the OData standard, can return data in either an XML and/or JSON format. SharePoint’s REST endpoint is located under the https://[…]/_api/ virtual directory of a given site. This virtual directory maps to https://[…]/_vti_bin/client.svc but you shouldn’t be using this directly as the best practice is to use https://[…]/_api/. The URL of a typical RESTfull HTTP request is composed of three parts: the service root URL, resource path and query string options. Looking at this in the context of a simple SharePoint RESTfull call to retrieve the top two lists within a site, ordered by title, we’d have a query similar to the following:

Figure 1: A RESTful call can be broken into three different components.
The URL format is essentially a drill-down format where each part of the path allows you to dig deeper into the containment hierarchy of the Site Collection. Constructing your URL queries using this format, combined with the appropriate HTTP verb (GET, POST, PUT, MERGE or DELETE) and some standard header values allows you to quite easily work with and manipulate your SharePoint Online environment. A full discussion on how to work with the REST service is out of scope for this article, so I recommend that you take a look at the Get started with the SharePoint 2013 REST service MSDN article for more information. For this article, I want to focus on why you might want to use the REST service as opposed to CSOM and how you would actually utilize the service with Windows PowerShell (this latter point being the primary focus of this article and the next).
Why use the REST service?
So why might you want to use the REST service instead of the CSOM API previously discussed? There are many reasons but I believe it comes down to two key points. First, using the REST service means that you don’t have to have any dependencies on downloads such as the SharePoint Online Management Shell or the SharePoint Client SDK, which contains all the .NET assemblies used in the CSOM examples demonstrated in the CSOM articles mentioned previously (though as you’ll see later, having the SharePoint Online Management Shell installed makes setting up our connection easier and as such we’ll utilize it in this article).
The second reason to use the REST service is that Microsoft is constantly updating SharePoint Online and O365 in general and as part of these updates, we’re seeing numerous additions and enhancements to the REST service. As the REST service gets updated and new endpoints are added, the CSOM API is often way behind in receiving corresponding updates, if it gets them at all. In fact, there are many new O365 REST endpoints that have no equivalent managed CSOM API available and there is no indication as to when such an API will be available. So, to be able to utilize the full breadth of remote management capabilities available to you, it is inevitable that you will eventually have to start working with the various REST services.
Making a REST call
In order to make a RESTfull call to the SharePoint Online REST service you must provide valid credentials and perform a couple of steps to associate those credentials with the web request. Ultimately, what gets sent as part of the request is not your actual credentials but rather a security token that is stored as a cookie and sent along with the request. To make the process of getting this security token and cookie easier, I recommend that you utilize the Microsoft.SharePoint.Client.SharePointOnlineCredentials class which was covered in the article, Connecting to SharePoint Online using the SharePoint CSOM API with Windows PowerShell. As detailed in that article, to use this class you must first make sure that you have it available by either utilizing the Microsoft SharePoint Online Management Shell or by downloading and installing the SharePoint 2013 Client Components redistributable package. For more information about making the class available, refer to the Connecting to SharePoint Online using the SharePoint CSOM API with Windows PowerShell article. For the purposes of this article, I’ll assume you have the SharePoint Online Management Shell installed and will explicitly load the needed assembly from the installation path (as opposed to just using the SharePoint Online Management Shell directly):

Figure 2: Load the Microsoft.SharePoint.Client.Runtime.dll assembly to make the SharePointOnlineCredentials class available.
To create the credential object that you will use as part of the web request you can simply use the Get-Credential cmdlet and then create a new instance of the SharePointOnlineCredentials class, passing in the appropriate constructor values:

Figure 3: Best practice: use the Get-Credential cmdlet to retrieve your credentials and then use the properties on that object to initialize the SharePointOnlineCredentials object.
Once you have the credentials stored, you can now create a new System.Net.WebRequest object and set the credentials to the Credentials property of the object instance:

Figure 4: Create a new System.Net.WebRequest object and set the Credentials property.
Note that you could also use the Invoke-WebRequest cmdlet but I personally prefer working with the System.Net.WebRequest object directly as it gives you a bit more control over a few different aspects of the request. Also, notice that I’ve had to escape the dollar sign ($) in the query using the tick mark (`) so that PowerShell doesn’t interpret the query string values as variables.
Before you can actually trigger the request and get a response, you must also set a couple more properties. Specifically you need to, at a minimum, set what format you want content returned in by setting the Accept property and add a header value to indicate that forms based authentication is accepted. For the Accept you can specify that you would like the data returned as either XML or JSON. If you want to use XML then set the Accept property to “application/atom+xml”, otherwise, to use JSON set the value to “application/json;odata=verbose”. In this example I have set the odata value to verbose but you can also use MinimalMetadata or NoMetadata. Using verbose will give you the most details and will be appropriate for most situations. For the header value provide a key name of “X-FORMS_BASED_AUTH_ACCEPTED” with a value of “f”.
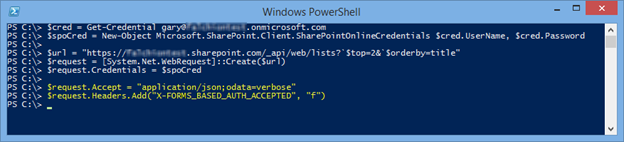
Figure 5: Set the content type and headers of the WebRequest object.
Depending on what actions you are performing, you may also need to set additional property values and header values. For instance, this example assumes an HTTP GET request as I’m just retrieving the details about a couple of SharePoint lists, but if I wanted to create a new list I’d have to change the HTTP method to be a POST request and provide some additional details within the body of the request. Examples of how to do all of this will be covered in the Working with Lists and List Items using the SharePoint REST Service and Windows PowerShell article.
Once the WebRequest object is initialized with all the necessary values, you can now use the GetResponse method to retrieve a System.Net.WebResponse object. This object provides all sorts of information about the HTTP response but what you’re typically going to be most interested in is the body of the response. This can be retrieved by creating a new System.IO.StreamReader object to which you would pass in the results of a call to the WebResponse object’s GetResponseStream method. With the body of the response now loaded into the stream reader object you can then simply call the ReadToEnd method of the StreamReader object to get the resultant data:
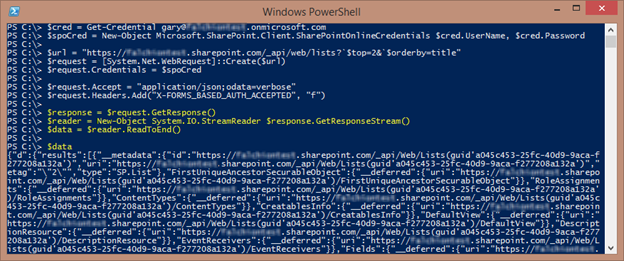
Figure 6: Use the GetResponse method and the GetResponseStream method to retrieve the response stream and associated data.
In the figure above, I’m outputting the results of the request to the console so that you can see that we are in fact getting back a JSON object in the form of a string. If you want to work with the results as an actual object then you can use the ConvertFrom-Json cmdlet, which will convert the string-based JSON data to a custom PowerShell Object (PSCustomObject) which you can inspect just like any other object:
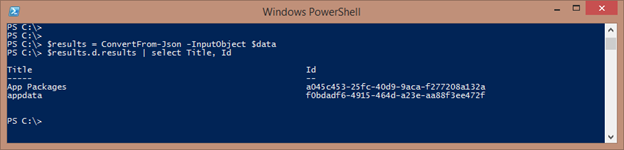
Figure 7: Convert the raw JSON data to a PSCustomObject using the ConvertFrom-Json cmdlet.
Summary
Working with the SharePoint REST Service is actually pretty straightforward once you get the hang of it. I often find that the most difficult part is knowing how to structure my URL to get, set, add or delete the information I’m interested in. Most of the information covered in this article is something you would do for each query you make to the service and only the URL might typically change. Because of this, it is helpful to have a utility function that abstracts away all the annoying little details of setting up the query. In the next article of this series, Using a Custom Windows PowerShell Function to Make SharePoint REST Service Calls, I will introduce two versions of such a function. This function will then be used throughout the various examples presented in subsequent articles.